
Update: October 7th 2015: I no longer sell nor support skyhook ATMs, but will keep this guide available as a reference.
Thank you for purchasing your new SKYHOOK ATM! With this device you will now be able to facilitate easy purchases of bitcoin from your own storefront terminal. Without further adieu, lets begin:
Quick Start Guide as per Skyhook Direct :
1. Power on the 2012 Nexus 7 Tablet.
2. For the Network Connectivity Selection choice, Choose option A or B.
A. Wired Connection – Plug the Ethernet cable directly into the ATM.
B. Drag from the Upper right corner of the screen to Configure Wifi Settings
3. Reboot the Tablet and allow it to load.
4. Plug the tablet into the Raspberry Pi in the Skyhook.
5. Drag down from the Upper right corner and enable tethering.
6. Wait for the device to boot (~ 60 Seconds), then launch Firefox. Holding your finger on the screen will switch it to full-screen mode.
7. Once your skyhook is connected, the Tablet will load the operator configuration panel.
Update Guide for Skyhook ATM:
Warning: Failure to change your password as described below may compromise your ATM security so be sure to change the password after gaining access via SSH.
To update your Skyhook you will need:
- Putty (software that will allow you to connect and use SSH on windows).
- A Linux Live CD to modify the passwords file and allow SSH access
- Win32 Disk Imager (for backing up the image on Windows)
- Access to the internet to ‘git-pull’ the latest Skyhook updates
- Patience
Backing up the current software
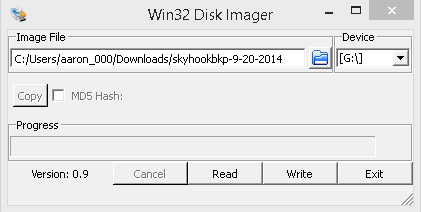
1. To start you will want to make a backup of the SD card connected to the raspberry pi. This card has the software that powers the actual skyhook integrates between the bill validator and your bitcoin wallet. To do this, you can use Win 32 Disk Imager. After you plug in your SD card into the computer, Run Win32 Disk Imager, select the drive letter that is assigned to your SD card drive (perhaps your drive letter is G:\).
2. Then click the blue folder button on the upper right side
3. Create a new folder, call it Backups OR navigate to your folder where you plan to store your backups.
4. Write ‘something meaningful’ to name your backup in the filename area – I named my backup “skyhookbkp-9-20-14” then press Open.
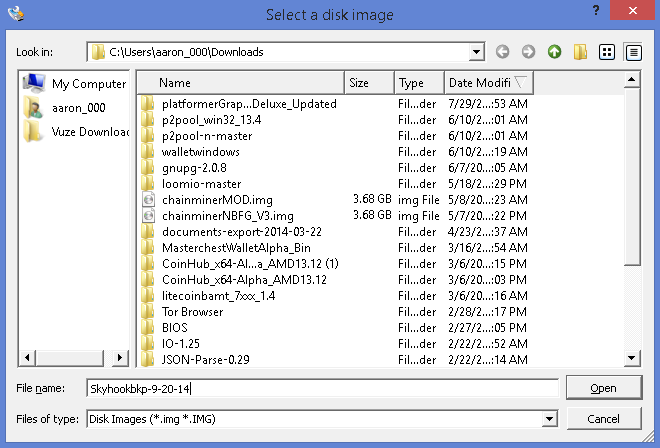
5. Click Read to copy save the contents of the SD drive over to the folder mentioned in Step 1
Enabling SSH access for your raspberry pi :
We want to enable SSH access so that we can login to the Raspberry pi and run periodic software updates via the ‘git pull’ command on the /skyhook/ directory periodically. To do this we will be modifying the Raspberry pi passwords file to set the password for the username “pi” which will include sudo privileges (Typing sudo in front of a command is the equivalent to “Run as Administrator”)
1. Grab a LiveCD. There are literally dozens to choose from and most of them are very large in size, so I have included a link to a smaller Linux Distribution (referred to as Distros) called TinyCore Linux. This file is an .ISO file and will need to be burned to a CD or used to load a Virtual Machine.
2. Use a CD Burning software that will allow you to create a Data Disc:Other and select Disc Image. This will create your LiveCD so that it can be used to boot into Linux.
3. If you plan to use the same computer that you are using right now to read this then Print these directions…SERIOUSLY…
4. Restart your PC with the LiveCD inside (if your computer boots directly to the hard drive, then use your Bios settings to set the Boot order, Have your CDRom selected first before your hard drive and be sure to ‘press any key to boot from cd’ upon restart)
5. With the LiveCD booted, insert the SD card used for the Skyhook. Upon Loading it, your Machine will identify it as something like “/dev/sdb1” or perhaps “/dev/sda”. Take note of whatever your SD card has been identified as and use that in step 8 when mounting the SD card to the system.
6. Open Terminal – it will look like a command line interface from DOS, but still be different.
7. Copy the following into your terminal (OR type if you printed this):
sudo mkdir /mnt/skyhook
8. You have created a directory to load the Skyhook files from the SD card into. This is known as “mounting” the device. Now type (Using YOUR name for the SD card given):
sudo mount /dev/sdb2 /mnt/skyhook
9. Once it is mounted correctly, we will want to access the passwords file with:
sudo nano /mnt/skyhook/etc/shadow
10. Notice that this is the passwords file and that there are different machine usernames along with the traditional root and the one we want to modify, the ‘pi’ user. Comment out the existing pi user by placing the # symbol in front of the line.
11. copy the following line into your passwords file, I suggest placing it right below the commented out line:
pi:$6$AGHK.cNv$fD2nQczBgo3F0/8VlS5SV6Qnop4IRN04PGvpdfWkV6w1fTVVw04JNYosmNmhmhTidZnyu817QDLBOCx9bVdiP1:16077:0:99999:7:::
This line was taken from a stock install passwords file of Raspbian, which is a customized version of Debian (another Linux Distro) made for Raspberry Pi.
Your new default password is now: raspberry
12. Save your passwords file by pressing the CTRL key and the X key at the same time. Confirm by pressing Y twice, once for Saving the file and again to confirm overwriting the file.
13. Do not remove the SD card yet!!! Disconnect it first by typing in:
sudo umount /mnt/skyhook
14. It is now safe to remove your card. Plug it back into the Raspberry pi in the ATM, Plug in an Ethernet Cable, and Start up your Skyhook with the Quickstart, using Option B.
15. Remove the CD from your PC and restart the computer into Windows.
16. Using your Router or an IP address Scanner, determine the IP address of your ATM machine.
17. Fire up Putty. Type in the IP address of your ATM into the field that says hostname. So for instance if my IP address found for the Skyhook was 192.168.1.72, My Putty window would look like this:
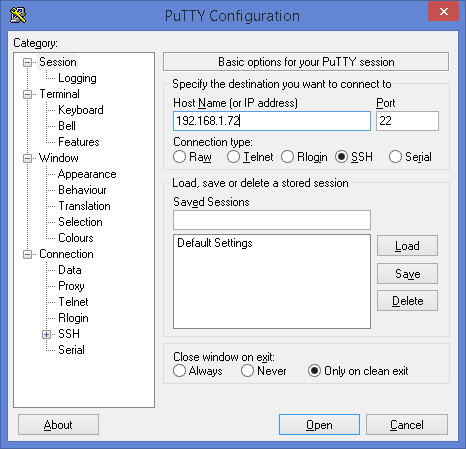
17. Press Open. Your username is “pi” and your password is “raspberry”. Putty will give you a warning message about the RSA fingerprint being secure. the tl;dr = press okay, you knowingly pointed to the correct IP.

18. Lets change your password NOW (make sure you remember it otherwise you will have to do everything all over from step 1!) to do this, type:
passwd
Updating the Skyhook software
The moment you’ve been waiting for, updating your Skyhook software to recieve the lastest and greatest software updates! Lucky for you, this step is very easy. The prior steps above were required to allow you to easily update your skyhook in the future as more features are rolled out.
1. Using Putty, log into the Skyhook ATM via SSH. (if you are following along, you have already done this step above)
2. Type or Copy/Paste the following into the terminal:
cd /var/www/btc
3. Finally, type:
git pull
4. This command is built-in and uses git, a software revisioning and updating tool used heavily in Linux. It will ask you to confirm file modifications, press Y to continue and update the Skyhook to the latest software update.
And there you have it! This is a step by step guide on how to initialize and update a Skyhook ATM. Special thanks goes out to TKRSRY whose guide was referenced for creating this one, Jon Hannis for guide reference support, and to SoapSuds-Bitcoin for the Setup Guide Directions listed.
16 thoughts on “Skyhook Support Guide (Windows)”
Jesse Michek
(February 19, 2015 - 9:34 pm)Hey man,
So super new at this. Ive just snagged myself a skyhook ATM and I’m having troubles connecting it to a network. So, I’ve spent the last 4 days learning all about tiny core and Linux and I’ve followed your steps to the T. However, I am stuck on step 10. When trying to SSH the raspberry pi.
“Notice that this is the passwords file and that there are different machine usernames along with the traditional root and the one we want to modify, the ‘pi’ user. Comment out the existing pi user by placing the # symbol in front of the line.”
Where exactly do I do this? Because this is all I see.
Thanks for your help!
frankenmint
(February 19, 2015 - 10:05 pm)There is no file there (its empty), which means you likely have not mounted the software correctly. If, on step 8, you simply copied my line into your command line, you probably didn’t enter in the correct device id for your sd card. Try this:
press ctrl+c to close the (empty) shadow window. In a terminal window type/paste: lsblk. (http://superuser.com/questions/352598/how-to-find-the-dev-name-of-my-usb-device) From there It should list the connected SD cards and their appropriate id.
(if you haven’t messed with the card, then there should only be the one partition) – use the partition id (not the parent device id) to mount the files into tinyCoreLinux so that you can modify that shadow file and set a default password.
One way to check that your skyhook firmware mounted correctly is to type: ls (similar to MS DOS: dir) which will list all files and folders – if you mounted them correctly then the files should appear, otherwise it will be blank like your screenshots above.
If successful, your shadow file should look like this:
root:*:16077:0:99999:7:::
daemon:*:16077:0:99999:7:::
bin:*:16077:0:99999:7:::
sys:*:16077:0:99999:7:::
…
with more usernames (these are usernames with no active password – no way to log in) You’re simply replacing the existing default raspberry pi password (which is unknown) to an existing hashed password that is known.
Jesse Michek
(February 20, 2015 - 10:00 am)That did it. It was a minor mistake. I forgot to select the mounted device which was sdb2. As soon as I did that and reentered the codes I was able to edit the line. Still a mega noob here so before I continue on with the other steps I just want to make sure I’m fixing the right problem first.
So the problem with my skyhook is that it will not connect to the network when I try to calibrate my admin settings. I can still browse Firefox just fine but when I try to play around with the admin settings it won’t connect and consequently, doesn’t save any of my info when I’m done.
I shot Jon Harris an email and this was his reply:
Is the SD card ‘Locked’?
Are you able to SSH into the unit? If so, you may need to chmod on your /var/www/btc/enc.json file.
Regards,
Jon
There’s little to no guides out there for us amateur, Bitcoin enthusiasts when operating a skyhook in this way but your guide seemed to have the answers I was looking for. So before I continue on, am I addressing the right problem?
Again, thank you so much for your help man.
Jesse Michek
(February 20, 2015 - 11:16 am)Also, is it essential that I use an Ethernet cable during this? I’ve been using wifi.
frankenmint
(February 25, 2015 - 6:41 am)sorry for the late reply/back. Its not, but that will ensure things go smoothly without any regard to packetloss or connection issues.
Jesse Michek
(February 25, 2015 - 5:57 pm)Ok, cool. I seem to have fixed the network connectivity issue. Now my cash feeder is malfunctioning. When you insert a note into the machine it registers the transaction on the ATM and then spits the note back out. These little machines sure are a headache ><
frankenmint
(February 25, 2015 - 8:26 pm)I don’t have the exact article where I remeber referencing it but I think that is fixed by updating either the skyhook firmware which should now be really easy with git pull or if you’ve done that then try updating the Apex bill collector firmware:
http://www.reddit.com/r/projectskyhook/comments/2rwyau/psa_our_skyhook_atm_in_san_diego_accepted_a_bogus/cntw8w7
Its not for the faint of heart and appears to require either windows pc with .net framework (free and large) installed. I’ll be happy to help on any other roadblocks or questions.
Jesse Michek
(February 20, 2015 - 6:28 pm)That did it. It was a minor mistake. I forgot to select the mounted device which was sdb2. As soon as I did that and reentered the codes I was able to edit the line. Still a mega noob here so before I continue on with the other steps I just want to make sure I’m fixing the right problem first.
So the problem with my skyhook is that it will not connect to the network when I try to calibrate my admin settings. I can still browse Firefox just fine but when I try to play around with the admin settings it won’t connect and consequently, doesn’t save any of my info when I’m done.
I shot Jon Harris an email and this was his reply:
Is the SD card ‘Locked’?
Are you able to SSH into the unit? If so, you may need to chmod on your /var/www/btc/enc.json file.
Regards,
Jon
Obviously I need to do some homework on this thing if I’m going to be a successful ATM operator so I’ve literally spent the last 5 days learning all about raspberry pis and Linux. There’s little to no guides out there for us amateur, Bitcoin enthusiasts when operating a skyhook in this way but your guide seemed to have the answers I was looking for. So before I continue on, am I addressing the right problem?
Again, thank you so much for your help man.
Mark Vick
(May 8, 2015 - 1:06 pm)I have a SkyHook that began throwing a MySQL error. I can only guess that this is due to power outages – it finally corrupted itself. Is there an original image that can be burned onto an SD Card and get the machine back to day 1 configuration? I have a few img files of various vesions, but have spent hours trying to get the machine to fire up, but nothing . . .
frankenmint
(May 8, 2015 - 1:12 pm)Try this:
https://btcpdxllc.box.com/shared/static/o6q2jp9cz6oakpovp2xx.zip
Seems to be live as of today. I found it from here: http://www.reddit.com/r/projectskyhook/comments/2ov69x/where_is_the_latest_image_located_so_i_can_get/
Link is 4 months old so it’s bound to be a fairly fresh build as far as I can tell.
Mark Vick
(May 8, 2015 - 5:33 pm)I have tried that one – I get two partitions on the drive – a small FAT32 one and a linux one. In the Pi, the linux one evidently is not booting. I think I need to figure out how to mark that lInux partition as the primary boot – but the tablet will not navigate to the Skyhook software no matter what I try. Never had this much problem before . . .
frankenmint
(May 8, 2015 - 5:40 pm)Sorry I don’t have any other advice for you.
Using your suggestion I found this:
Log in to the Linux computer.
2
Launch a command shell by clicking on the “Terminal” icon on the graphical desktop.
3
Elevate the shell’s privileges. The specific way of performing this step depends on the Linux distribution. For instance, for Ubuntu, type the following command into the shell:
sudo -i
Press “Enter.” Linux will prompt you for your password; enter it.
4
Type the following command into the shell:
fdisk /dev/hdb
Replace “/dev/hdb” with the Linux name of the device where the partition is contained.
5
Type “a” into the active “fdisk” prompt, then press “Enter.” fdisk will prompt you for the number of the partition whose bootable flag you want to set; enter it, then press “Enter.”
6
Type “w” and press “Enter.” fdisk will save your modification to the partition table and exit. At that point, your partition will have been marked as active.
Read more : http://www.ehow.com/how_8506002_set-partition-active-linux.html
omni bitcoins
(June 17, 2015 - 10:14 pm)Thanks for the guide!
I’m stuck at the last step! Here’s what I get:
pi@skyhook /var/www/btc $ git pull
fatal: Not a git repository (or any of the parent directories): .git
I’ve tred cloning from the official latest version on github but the folders other permissions than /var/www/btc folder. (owned by root:root instead of www-data:www-data)
Please help!
frankenmint
(June 17, 2015 - 10:22 pm)Using this page here: http://www.linuxnix.com/2011/12/chown-command-linuxunix-explained-examples.html
I think you need to try change the owner permissions using this:
chown www-data /var/www/path to the cloned file. HTH
omni bitcoins
(June 18, 2015 - 4:10 pm)Thanks Frankenmint I’ll try it out!
omni bitcoins
(June 18, 2015 - 5:14 pm)It worked!
It doesn’t boot though but I think it’s a whole other question… no worries 🙂
Thanks!